Tuesday 22 December 2015

Exhibition Photographs

For our Creative Practice Assignment 1, as a group, we took 6 Photographs about 'depression' for an exhibition.

My group

Kimberly McClarnan
Miriam Nosworthy
Jack Wilson
Liam King

6 Photographs


Friday 18 December 2015

Lighting

Types Of Lighting


  1. Background: The room has standard lighting (out of view) that illuminates the room and the backdrop.
  2. Spot light: The small black thing on a tripod on the left provides direct light, currently on the backdrop.
  3. Softboxes: The pair of white squares are translucent fabric over lamps to provide soft, diffused, main light over the subject.
  4. Umbrella: Top right is a gold umbrella which reflects a spot light. This could be a strobe (flash) light to put some bright “key” light on the model’s face.
  5. Reflector: The gold circle on the right can reflect light into dark areas, such as under the chin, and can be held by an assistant. When they’re not making the coffee.
Website - http://photosecrets.com/studio-lighting-for-beginners
From this website, it has help me learn more about different lighting used in a studio.

Background Light - This light helps remove shadows behind the subject

Main Lighting - Provide general lighting all around the subject. Inside the black fabric canopies are lamps. They can be continuous bright lamps, or strobes which fire like a flash. Either way they will be bright and require some power packs.

The canopies (softboxes) — To provide a white fabric screen that the lamp shines through. This disperses the light for that all-important even distribution of soft, diffused light.

Overhead Light - To provide the effect of general sunlight. This is difficult to do, need a big tripod, a convenient I-beam, a gantry, or some other sturdy structure.

Key Lights - This is usually a strobe (flash) into or through an umbrella. The key light provides the light for the viewer’s perspective. If using a camera flash unit, place it off camera with an extension cable to avoid a bright and direct reflection.

Bounce Light - Fills in some darker areas, such as under a person’s chin. You could use another lamp. Reflect light from an existing source using some white card or a fabric reflector.

Saturday 28 November 2015

Double Exposure


Double exposure is where one picture is superimposed over another. It can have a corresponding meaning in respect of two images and to convey the mood. With double exposure technique, you can create certain effect like ghost image, mirror image. 

Tuesday 17 November 2015

How To Tell a Story With Still Images

A photograph has the ability to convey emotion, mood, narrative, ideas and messages – all of which are important elements of story telling.

The Short Story

Stories come in all shapes and sizes. Some are long (novels or even trilogies of novels) but others are short. Thinking photographically, these short stories might be one, or maybe two, images.
Most newspaper photography fits into this category of story telling – one image that attempts to capture the essence of an accompanying written story. They don’t have the luxury of multiple frames to introduce, explore and conclude so almost always tell the story of a single event rather than a longer one.
Such shots need to have something in them that grabs the attention of a viewer. They also will usually have visual and/or narrative focal points that lead the viewer into the photo.
Short Stories photos are often shots that leave the viewer of the photograph wondering about what they are looking at – not because they don’t understand it but because they intrigue and leave people imagining what is going on behind the image and what other future images of the scene might look like. In a sense these single image stories are often just as powerful because of what they don’t include in the shot as to what they do include.
Introduce Relationship – When telling a story through a single image think about including more than one person in the shot – when you do this you introduce ‘relationship’ into a photo which will conjure up all types of thoughts in the viewers of your shots.
Also think about context – what’s going on around your subject? What’s in the background? What does the other elements of the photo say about your subject and what’s going on in their lives? Of course you don’t want to be too obvious about setting your background up – doing so could lead to cliched shots.

Multiple Image Stories


ell a story with your images is to take a series of them. In a sense what you’re doing here is a step towards shooting a movie with your shots (a movie is a sequence of many thousands of images run together to tell a story).
Series of shots used to tell a story can be anything from two or three shots arranged in a frame or collage through to hundreds of shots arranged in an album (online or printed).

Structure

1. Introduction – shots that put the rest of the images into context. These shots introduce important characters that will follow, give information about the place where the story is happening, set the tone that the story will be told in and introduce the themes that the story will meander through (see below for more on themes).
Introductory shots need to lead viewers into the body of the story. If you think about a good novel, it’s often the first few paragraphs that determine whether people will buy and read the book in full or not – the same is true with visual stories. Introductory shots should give people a reason to go deeper into the story.
So in a travel album – these shots might show the travelers packing, could include a macro shot of a map of the destination or of the tickets etc.
2. Plot – good stories are more than just empty words. They explore ideas, feelings, experiences etc on a deeper level. Plot shots will probably make up the majority of your photographic story. They show what happens but also explore themes and ideas.
So in a travel album I try to identify themes in my shots that I will revisit throughout a trip. Types of themes might include:
  • Visual themes – perhaps colors or shapes that come up again and again on a trip – for example a friend recently showed me his album from a recent trip to the Greek Islands that featured quite a few shots with white buildings and blue seas – very powerful.
  • Stylistic themes – repetition of photographic techniques and styles. For example on my last overseas trip I decided to include a series of macro shots of the different flora that I saw and ended up with a series of shots of flowers from a variety of different parts of the world.
  • Locational themes – reoccurring photos from similar types of places. For example on a trip a few years back I decided to make ‘markets’ a theme in my shots across the trip. I sought out and photographed markets in every city and town we visited. I found it fascinating to see the similarities and differences between them.
  • Relational themes – shots that focus upon a person or people over time. On a travel story this might document the moods of a person as they go through the highs and lows of travel or could document the development of a relationship between friends, lovers, siblings etc over time.
3. Conclusion – good story tellers are quite intentional about the way they end their stories. Last impressions count and it’s worth considering what lasting image/s you want to leave with the viewer of your photos.
By no means do you need to tie up your story neatly (good stories sometimes leave people feeling unsettled and wanting resolution) but do consider how you want to end.
To continue our travel story example, concluding shots could be anything from the cliched sunset shot (I think it’s been overdone personally) through to airport shots, unpacking shots, plane shots, some shots from the last meal at the destination, signs to the airport etc.

http://digital-photography-school.com/telling-stories-with-photos/

From this information, it will help me and my group for our upcoming assignment on taking 15 still images and telling a story from them.

Freytag's Pyramid


Freytag's Pyramid

Gustav Freytag was a Nineteenth Century German novelist who saw common patterns in the plots of stories and novels and developed a diagram to analyze them. He diagrammed a story's plot using a pyramid like the one shown here:


1. Exposition: setting the scene. The writer introduces the characters and setting, providing description and background.

2. Inciting Incident: something happens to begin the action. A single event usually signals the beginning of the main conflict. The inciting incident is sometimes called 'the complication'.

3. Rising Action: the story builds and gets more exciting.

4. Climax: the moment of greatest tension in a story. This is often the most exciting event. It is the event that the rising action builds up to and that the falling action follows.

5. Falling Action: events happen as a result of the climax and we know that the story will soon end.

6. Resolution: the character solves the main problem/conflict or someone solves it for him or her.

7. Dénouement: (a French term, pronounced: day-noo-moh) the ending. At this point, any remaining secrets, questions or mysteries which remain after the resolution are solved by the characters or explained by the author. Sometimes the author leaves us to think about the theme or future possibilities for the characters.

You can think of the dénouement as the opposite of the exposition: instead of getting ready to tell us the story by introducing the setting and characters, the author is getting ready to end it with a final explanation of what actually happened and how the characters think or feel about it. This can be the most difficult part of the plot to identify, as it is often very closely tied to the resolution.


http://www.ohio.edu/people/hartleyg/ref/fiction/freytag.html

From this, it has giving me a better understanding of Freytag's Pyramid

Tuesday 3 November 2015

6 Picture Story

For our task for University, we were set into groups to take 6 shots around Swansea and tell a story. The first two shots here shows me walking down the SA1 in Swansea, taking in the views before heading to the National Museum. The next 4 shots shows me arriving at the museum and looking around, browsing and leaving the building.


F5.6 1/100 ISO 100


F5.1 1/100 ISO 100


F5 1/100 ISO 100


F3.8 1/80 ISO 200


F3.8 1/80 ISO 200


F6.3 1/200 ISO 100


Monday 2 November 2015

Understanding Exposure

What I understand from Exposure

Reference: https://blog.katchup.com/understanding-exposure/
Aperture

Aperture expand and contract to let more or less light inside. Aperture settings tell you lens how much or how little light you want to let inside your camera to hit, and register on, your camera’s image sensor.


Reference: https://blog.katchup.com/understanding-exposure/


Reference: https://blog.katchup.com/understanding-exposure/
The higher the focal length, gives you less exposure because they represent smaller apertures. These settings allow less light into the camera and give greater depth of field.


Reference: https://blog.katchup.com/understanding-exposure/

Shutter Speed

Shutter speed on the camera controls how long light is allowed to travel through the lens and onto the image sensor. 


The settings are measure in seconds and fractions of seconds so the faster the shutter speed, the shorter time the image sensor is exposed to light. The slower the shutter speed, the longer time the image sensor is exposed to light.


Reference: https://blog.katchup.com/understanding-exposure/
ISO

The levels of a film’s sensitivity were measured in numbers that started at 50 and then doubled, so 50, 100, 200, 400, 800, 1600 and so on. The higher the number, the faster the speed ­– and the greater the sensitivity or responsiveness to light.

Noise

The only thing that happens when you increase the ISO of your camera to increase the sensor's sensitivity to light is 'noise' which looks like tiny dots or pixel on the image and can make images look blurry when they are blown up in size.


Reference:  https://blog.katchup.com/understanding-exposure/

From all of this information, it has giving me a better understanding of how exposure works. It will help me for future work and assignments.

My Shots

Last week I took home a Canon EOS 60D camera to have a look and to get familiar with. As I'm only a beginner, I didn't know how to use the camera properly so I went onto YouTube and followed the instructions on how to get the right picture for me. It took me a very long time but these are the shots I came out with:

F5 AP 1/15 Shutter Speed


F10 AP 1/8 Shutter Speed


'Tweaking' used on this image from Photoshop


Tweaking your colors, the wonders of Adjustment Layers, and bringing out and sharpening up the details in my texture

Understanding of Camera Angles

Camera Angles

Camera angles in films are very important because they are used to position the viewer so that they can understand the relationship between the characters.

Screen shots of camera angles from Harry Potter films:

High Angle Shot


High angle shot is looking down on Voldemort and makes the character seem smaller. It is not as extreme as the birds eye view shot.

Eye-Line Angle


The camera is positioned at the eye-line of Ron and their head are in level with the focus.

Low Angle Shot


The low angle shot is the reverse of the high angle shot. The camera is placed low looking up onto Hagrid which gives a feeling of power for the character.

Over the Shoulder Shot


The camera is positioned behind Harry which reveals their shoulder and the back of their head while Snape is shown front on in the background. It makes the audience feel like their are standing behind Harry when this is happening.

Point of View


Shot shows from Harry's point of view so it makes the audience feel like they are Harry receiving this letter.

Understanding Camera Shots

Camera Shots


Harry Potter is one of my favourite films to watch and over the past week I watched a few of them. While watching the films, I have screenshot a few stills to explain the different camera shots used which are very important for the film. They are important because they are used to demonstrate different aspects of setting, themes and characters.

In terms of camera distance with respect to the object within the shot, there are basically 7 types of shots:

Extreme Long Shot


Extreme long shot is generally the first shot at the start of each scene which is usually outside and establishes the setting.

Long Shot

Long shot usually shows the entire human figure which allows the audience to view the subject within the surroundings.

Medium Long Shot


Half way between a long and a medium shot. The shot frames a character then the whole body will be in view towards the middle ground of the shot.

Medium Shot


This shot frames from the waist up on to the character also showing some background.

Medium Close-Up Shot


Medium close-up shot is normally a close up on one or two characters framing the shoulders, chest or the head.

Close-up


Shot is tightly framed to show details and facial expression on Harry's face.

Extreme Close-Up

Reference: http://f.jwwb.nl/public/d/1/6/ckvlokaal/extrem-close-up-harry-potter.large.jpg

Shot is tightly framed. It can be used to stress the importance of a particular character at a particular moment in a film.

Thursday 22 October 2015

Understanding Depth of Field

Depth Of Field

What is Depth Of Field?

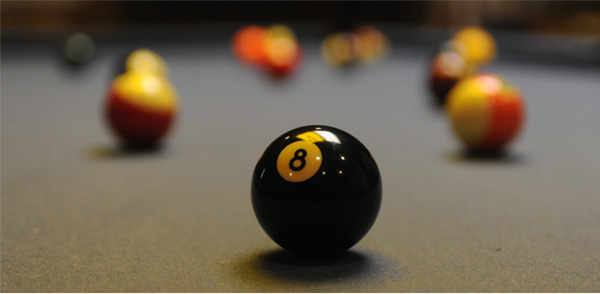
 Depth of field is when a camera can only focus it's lens on a single point, but there will be an area that stretched in front of and behind this focus point that still appears sharp. It’s not a fixed distance, it changes in size and can be described as either ‘shallow’ (where only a narrow zone appears sharp) or deep (where more of the picture appears sharp).

The three main factors that will affect how to control the depth of field on the images are: aperture, distance from the subject to the camera, and focal length of the lens on your camera. 


Reference: http://hyperphysics.phy-astr.gsu.edu/hbase/geoopt/optpic/1930poolballf28.jpg


Why is depth of field important?

Depth of field has an impact on both the aesthetic and technical quality of a picture. Sometimes you’ll want to use an extensive depth of field in order to keep everything sharp.
A shallow depth of field will be preferable to use as it enables you to blur the background and foreground details which causes distractions to melt away and allowing you to direct viewers to the focal point in a picture.
Aperture control depth of field

The size of the aperture controls the amount of light entering the lens. Using the aperture of the lens is the way of controlling the depth of field as you would set up your shot.

Large Aperture  = small f number = shallow (small) depth of field
Small Aperture = Large f number = deeper (large) depth of field

The above show the lower the f number, the smaller the depth of field is. The higher the f number, the larger the depth of field is.

Reference: http://media.digitalcameraworld.com/wp-content/uploads/sites/123/2013/03/Control_depth_of_field_camera_tips_DCM80.out_tech.leaf_f28.jpg


Understanding

From understanding depth of field, it is one of the important tools to use because having sharp images is one of the most important factors to getting the great shot you need. Knowing how to make the parts of my image sharp and the parts I want to be out of focus.

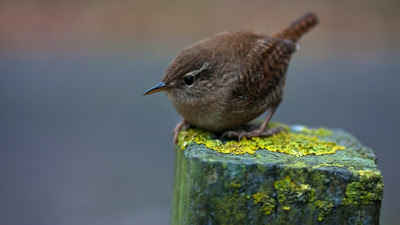
To use shallow depth of field, would be useful in wildlife, plants etc where you would want the subject to stand out from the surroundings. Increasing your aperture size will give you more light. Also it would be useful in sports games where I would want to separate the athlete from the background to bring attention to them. The result to this is using fast shutter speed.

Reference: http://www.wall321.com/thumbnails/detail/20140221/nature%20birds%20depth%20of%20field_www.wall321.com_64.jpg
You would use deeper depth of field when you want to get a landscape image as it is important to get as much of your scene in focus as possible. By using a wide angle lens and a small aperture I will be able to maximize my depth of field to get the scene in focus.


Reference: http://images.macworld.com/images/howto/graphics/150150-dof-blong-figure-3_original.jpg

This website I researched from was very useful and helpful to me because it has given me a better understanding on depth of field and would help me in the future for upcoming work and if I'm stuck, I can always come back to this and read over again.